-
Events Calendar User Guide
We use LiveWhale Calendar for publishing events to Schulich’s main calendar (and your own departmental listing), or for creating events that do not require registration. If your event requires registration, please start with EventBrite.
Before You Begin
In order to add events, you must be selected as a representative for your department. Please refer to the guidelines below to get started.
Need an account?
If your department already has an account set up and you just need access to the existing LiveWhale account, please connect with the Marketing and Communications department.
- Staff Login
Getting Started
Adding Events
View details Hide detailsUse the username and password provided by your LiveWhale Administrator.
In LiveWhale Calendar, you can manage events from Toolbox > Your Events
From the events manager, click the Add new button.

To create a title, replace red text with a title for this event. Make sure it is concise and informative.

All events must have images. Click on the space holder for images. Use this widget to select an image.

If there are none appropriate, you can upload an image. All images you upload here will go into a gallery that is unique to your department.
The data in the left column is event specific, and data in right column aids in searching.
At the top of the left column:
Input event Date and time details.
Enter Location and check Plot this event on a map. If the location is already saved, a map will automatically appear. If not, enter the address and a map will appear. Since the general public has access to our events calendar, we recommend that you exclude the location if registration is required.

On the right-hand column, you may adjust your event status to ‘Live’ or ‘Hidden’ by toggling the Green Button to Red. Note: always leave the event as ‘not archived’ or it will not show on the calendar even if it is ‘green’ or Live.
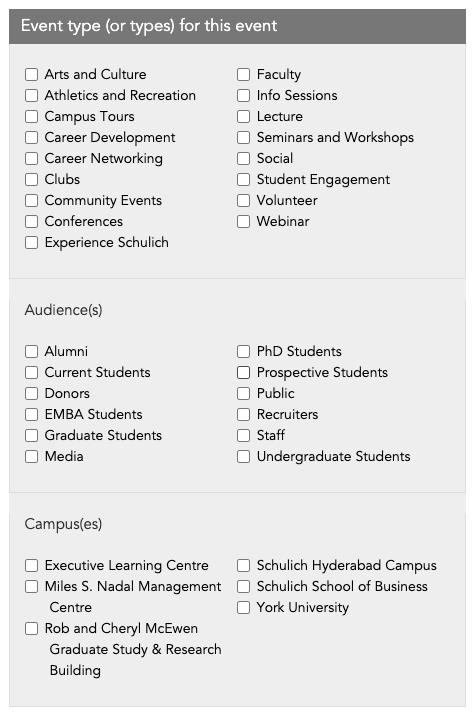
Select your Event type, Location and Audience. Multiple selection is possible.
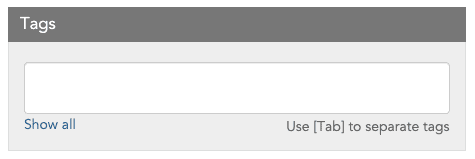
The tags function is not mandatory. You can use this if you want to use tags as a sort function for your department’s calendar.
Enter your Event description using the Rich Text Editor provided. Use this section to provide a concise summary of your Schulich event and its main purpose. Appeal to the reader by telling them what they’ll get out of attending.
To place a link to other events, information, or unique websites on your event page, use the Related Content tool. Hover over the type of item you wish to link, another event (searches for events in EventBrite), file (pop-up appears to add), or web address (provides link title and URL), and follow the prompts provided.
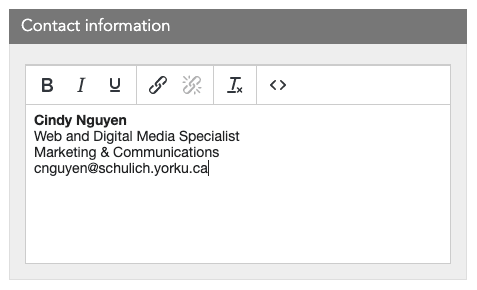
Enter Contact Information.
 You can ignore Register Link. This will be automatically filled in by EventBrite if registration is required.
Select Event Cost. If you are coming from EventBrite, this will be already set. Whatever you select will be shown on the calendar image (see examples below). If you do nothing, the default is set to place nothing on the image.
You can suggest your event to other departments or groups‘ calendars in Sharing and Privacy. Your event will automatically appear on the Main Calendar. Click on Show all Groups. A pop-up will appear; select the groups you want to share your event and click Use selected groups.
Leave Privacy Options as default and click Save and Go To Event.
Your event is now Live. You can edit your event by logging in again. you will be directed back to your department events page. You can review, preview and edit all your events from here.

If your event is canceled, please make sure to update its status in LiveWhale by selecting either the “Cancel” or “Delete” functions outlined below.
Note: “Cancel” and “Delete” are two different functions. By clicking “Cancel”, your event will continue to appear on the Schulich Events Calendar but will have “CANCELLED” appear before its title. By clicking “Delete”, your evennt will be removed from the calendar.
Open an event from your Group Calendar page.

To cancel an event, click on Cancel Event.

Click Save.

Your event status will show cancelled and will be listed on the calendar as cancelled.

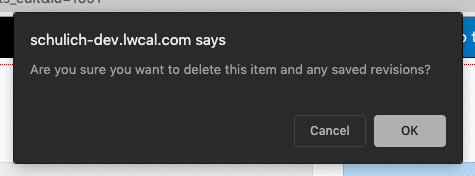
To delete an event, open the event by double-clicking on the event listing. When in the event, select the Delete Event Button.

A pop-up will appear to confirm your action.
When the event is deleted, a green banner will appear to indicate this.

Note: Once an event is deleted, it will not show in the calendar or event listing. However, it can be restored by accessing the Deleted Items from your Toolbox.


Submitting Events
View details Hide detailsIf you do not have login credentials, you can submit your events for approval by the Marketing and Communications department.
Featuring Events
View details Hide detailsThe Marketing and Communications team oversees the featured events in the main slider.
To put a request in to have your event featured, please contact the Director of Marketing and Communications.
For support with LiveWhale Calendar, including onboarding and feedback, please contact the Marketing and Communications department.